Good pictures are the BEST advertising you can use to market your goats. This page is dedicated to helping you take good photos of your goats.
Here are some recommendations for showing your goat off to the best of his/her potential:
General:
- Clipping your goat helps give them a clean look and lets the people see their conformation.
- If you can’t body-clip your goats, give them a ‘dairy clip’ i.e. trim the udders, feet, and any long hair.
- Keep the background of the picture as simple and uncluttered as possible. A sheet can provide a good background that will help people see the animal instead of your barnyard.
- Take your picture on flat, solid ground – a wood, concrete or blacktop surface is good. It is good if you can get a picture that shows the goat's feet well.
- When taking the side, front and rear pictures of your goats, get down at their level – your camera should be about level with the middle of their body or a little higher.
- Make sure you take the pictures square on – if you are too far to the front or back of the goat it can make your goat look like they have an out-of-proportion or lop-sided body.
- A show collar can help by giving you more control over your goat as well as giving the neck a cleaner look. A wide nylon collar like they might wear in the pasture is not a good option for taking good photos. Before starting your photo session, remove their regular collar and just use the show collar.
Side photos:
- You don’t want the goat hunched up, so keep their head up and in front and their rear legs back a little.
- Don’t stretch the goat out like a race horse – their front legs should be straight under them and their back legs back a little and plumb from hock to hoof with the thigh curving upward to the hip.
- For milking does, you want the rear legs set so that you can see 1/3rd of the udder in front of the leg, 1/3rd hidden by the leg and 1/3rd behind the leg.
- You want to show their topline well. Getting the feet set right will help with this a lot. You can also help level them out by pressing on whichever part of their back is too high - most goats will level their back out pretty well if you put pressure right behind the hips. This of course depends on their conformation - you can't make a really steep rump completely flat no matter how you show.
Rear/Udder photos (for milkers, this obviously shows the udder. For dry does and bucks, this shows the udder arch [also known as the escutcheon] as well as rear leg set, width between the hocks, straightness of leg, width of rump, and more)
- You want the rear picture to show their escutcheon (the arch between the legs where the udder is on a milking doe). This should be high and wide, so take the picture from an angle that the judge can see this area. This picture should also show their rear legs well.
- For does that are in milk, trim all excess hair away or, preferably, shave the udder. Make sure you take the picture right before milking so her udder is full.
- To help your goat place their rear legs correctly, place your hand on their hips and rock them from side to side. This will cause them to place their legs firmly, and will usually have them in the correct, natural position.
Front photos (gives viewer an idea of body capacity, correctness of feet and legs, etc.)
- For the front picture, you want to show the width of chest and straight legs – don’t let them splay their legs out - keep the legs square under the body.
- It is difficult to take a front picture at an angle that doesn't make them look silly as the head usually looks too large for the body.
- This is one of the less important pictures, so if you can't get a decent front picture, don't worry about it.
Top photos (gives viewer an idea of body capacity, spring of rib, etc.)
- In the top picture, keep their head straight in front of them so their body is straight.
Here are some pictures that show goats set up for pictures:
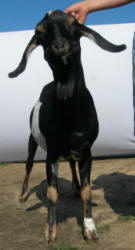
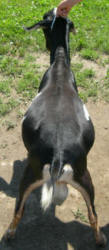
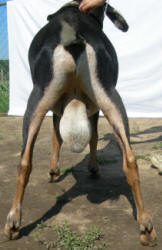
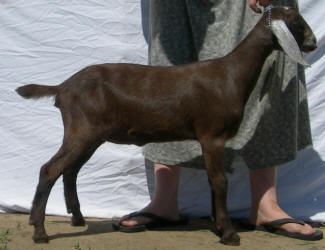
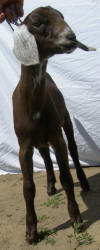
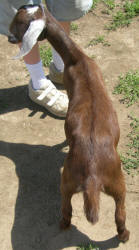
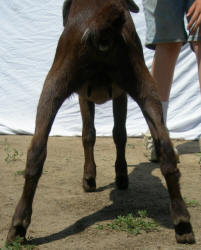
A doeling: (In this set of pictures, the side, front and top pictures are fine, while the rear picture is close to ideal - you can see her front legs squarely set with the rear legs correct as well. These pictures allow you to see her hooves as there is little to no grass in the way.)
Another doeling: (These pictures are pretty good although you can see that she didn't want to cooperate for the side picture. An improvement on the front picture would have been to have her rear legs set better. On the rear picture, it would have been good to include more of her rump.)
A dry yearling: (In this set of pictures, the side picture is excellent, but the rear and front pictures could use some work - in the front picture, she is not really standing square and in the rear picture, her legs are too far apart making her appear 'cowhocked'. The top picture shows her well.)
Another dry yearling: (In this set of pictures, the side picture isn't great, but o.k. the front picture is very good. The top and rear pictures are good although in the rear pictures, her legs are a little far apart.)
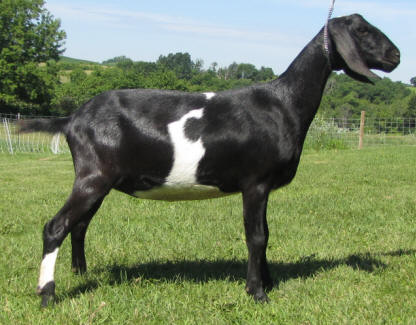
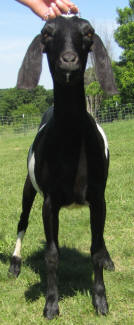
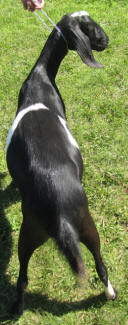
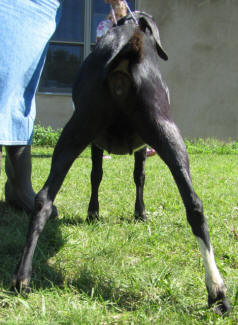
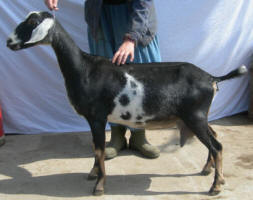
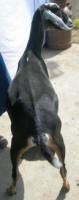
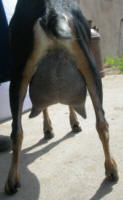
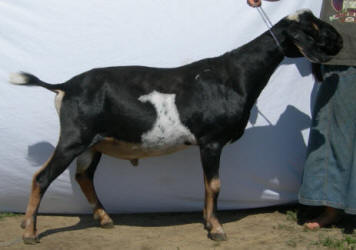
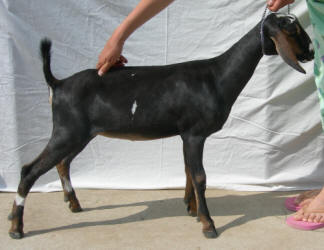
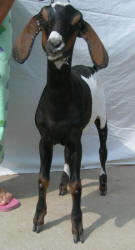
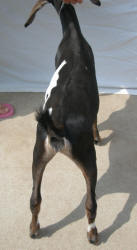
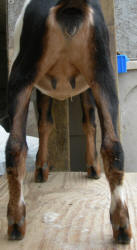
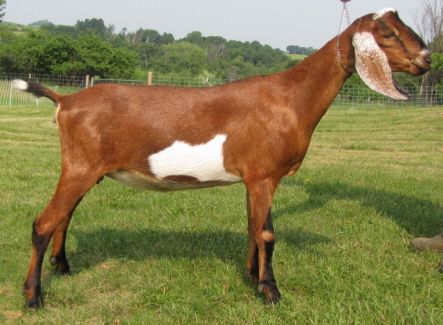
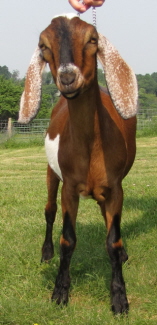
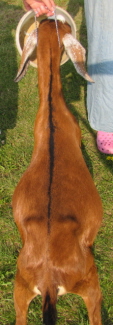
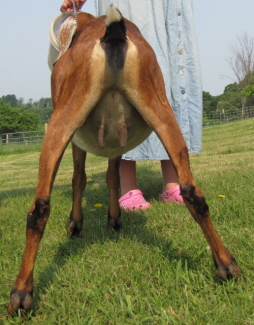
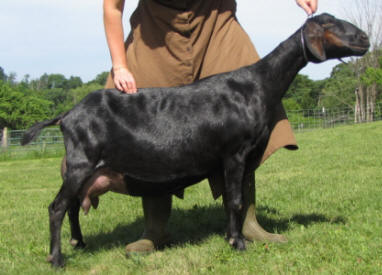
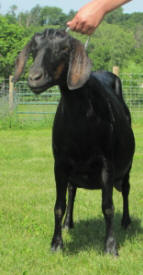
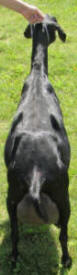
A milking doe: (This is about as close to an ideal set of pictures as you can come. In the side picture, you can see her legs squarely set under her, the head held up, the udder almost at the 1/3rd, 1/3rd, 1/3rd. The rear legs are correctly set with the leg straight from hock to hoof. In the front picture, you can see her wide chest, wide leg set and correct head. In the top picture, her rear legs could be set further apart, but you can see her body capacity and dairiness. In the rear picture, you can see her high, wide rear udder, wide rump, and one of her legs looks correct - the right one is a little off. It would be better if we had a hard surface to take the picture on as the grass doesn't show her full hooves.)

Another milking doe: (This set of pictures lets you see the feet better as it was taken on concrete. In the side picture, she is leaning a bit forward, but her rear legs are set nicely (hock to hoof straight and curving up from the hock to the hip), and you can see her nice dairy neck that the show collar sets off nicely. In the front picture, her legs are a little too close together, but not back. The top picture is excellent. The rear picture is good showing her full udder, straight legs and wide rump.)