How to Disbud Goat kids
Disbudding is probably THE most unpleasant part of goat raising, but it is very necessary to have healthy, safe goats. Horns are very necessary in the wild, but in a domestic setting, horns are a danger to the goat, other goats in the area, and their handlers. Domestic goats with horns often get stuck in fencing and can accidentally hurt each other and their human caretakers. Occasionally, a horned goat will turn mean once it figures out how to use it’s horns. So, although the disbudding process is NOT fun, the short amount of pain (less than one minute) is worth it to save potentially a lifetime of pain - I know of gorged udders, goats hung to death from getting their horns stuck, handlers eyes put out, not to mention the smaller issues like banged up shins.
Kids should be disbudded soon after you can feel their horn buds under the skin. Some kids are born with fairly large nubs the day they are born, while some you can’t feel until they are several days old. Bucklings usually need to be disbudded earlier than their sisters. I usually wait until the kid is at least 3 days old before I disbud and try to make sure I do it before they are over 14 days old.
Once you can clearly feel the horn bud under the skin and the kid is at least a few days old, they are ready to disbud. First, gather all your tools and preheat the iron.
You will need:
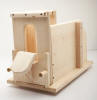 |
Hoegger’s Humane Kid Stall or other restraining device – you can just have someone hold the kid, but it is much easier with a stall. The kid is more likely to pull loose and get burned or get you burned if you just hold him. |
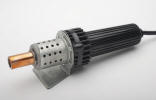 |
Disbudding iron. There are a number of options for this, but we use the Rhinehart x30 with a regular tip for our MiniNubian kid. |
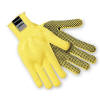 |
Gloves. |
 |
Tea tree oil - this helps the burn heal faster. |
Get everything set up before you bring the kid out. Plug in the iron and let it heat up. Be sure it is in a safe place where it cannot start a fire. It should heat for about 10 minutes or so before it is ready to use.
Once the iron is red hot (you can test it on a piece of wood and it should immediately burn a dark circle), get your kid out and secure him into the kid stall. Some kids don’t mind this at all, and others scream like you are killing them just because they don't like being restrained. Silly kids!
In order to make sure you get the iron directly on the horn bud, feel the head and know exactly where the horn is. I recommend clipping around the horn buds the first few times you disbud so that you can see them better.
Hold the kid’s head down with one hand making sure to keep their ears out of the way. Firmly place the hot iron over the horn bud. Keeping contact all around, rotate the iron around a bit to make sure it is thoroughly burned on all sides. Maintain contact for about 10-12 seconds. When you take the iron off, you should see a copper or white colored ring around the horn bud with some amount of horn sticking up still. If the ring is black, you did not burn long enough.
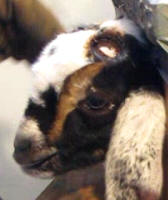
Below is a well done bud prior to popping the cap off:
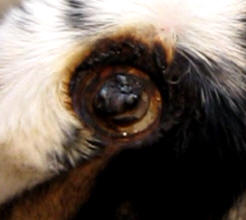
Give the kid a little time for his head to cool off and then repeat on the other side.
Now it is time to ‘cap’ the horn buds. There are two ways to do this – one is to use the side of the iron and just flatten the top of the horn. We recently learned a new way that seems to be more effective in preventing scurs. This is to place the iron over the horn again and apply sideways pressure to pop the horn cap off. This will leave a white spot where the horn used to be. Let the head cool a little and repeat on the other side.
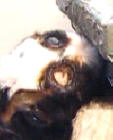
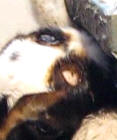
The pictures below show the closest horn with the bud off and the other on:
Now, for doelings, you are done. Bucklings you can use the iron to descent them as well. This will not prevent them from smelling, but can reduce the odor a little. For this, you just make a small half moon with the iron behind and slightly to the center of the horn buds.
Apply a few drops of tea tree oil to the burns. Remove the kid from the stall and cuddle him a bit. I often give them a bottle after disbudding and they seem to forget the whole thing very quickly.
Keep an eye out for scurs (small amounts of horn regrowth). If scurs occur, you can reburn. It is usually several weeks before you can notice scurs.
Watch a video of disbudding below or click here to see it on YouTube.
![]() TIPS:
TIPS:
Use an active air purifier like the Fresh Air Surround or the GreenTech GT 3000 to drop the smoke out of the air faster and to get the smoke smell out of your clothes.
Always have 2 people. I am sure it can be done with one, but it’s a WHOLE lot easier with two!
If there is any bleeding, you can cauterize it with the iron.
It is very helpful if you can have someone show you how to disbud in person before you have to do it yourself. This is not possible for everyone, but there are more and more people who are willing to show you how. We usually have at least one class on our farm in WI each year to teach people how to disbud and take care of other kidding season tasks.
Warnings:
Do NOT apply the tea tree oil before you are completely done with the disbudding – touching up the burn with the hot iron will ignite the oil on the kids head.
Resources
Hoegger's Goat Supply (Disbudding Iron, Holding stall, and tea tree oil)